No edit summary |
(spam) |
||
| (27 intermediate revisions by 22 users not shown) | |||
| Line 1: | Line 1: | ||
| − | elzelric |
||
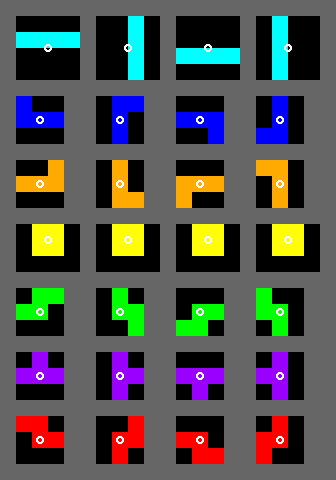
[[Image:SRS-pieces.png|thumb|All rotation states of all seven tetrominoes. From top to bottom: I, J, L, O, S, T, Z. The circle doesn't appear in the game; it helps to illustrate the axis on which each tetromino rotates.]] |
[[Image:SRS-pieces.png|thumb|All rotation states of all seven tetrominoes. From top to bottom: I, J, L, O, S, T, Z. The circle doesn't appear in the game; it helps to illustrate the axis on which each tetromino rotates.]] |
||
| − | '''''Super Rotation System''''', or '''''SRS''''' is the current [[Tetris Guideline]] standard for how [[tetromino |
+ | '''''Super Rotation System''''', or '''''SRS''''' is the current [[Tetris Guideline]] standard for how [[tetromino]]es behave, in a broad sense. SRS represents where and how tetrominoes spawn, how they [[rotate]], and what [[wall kick]]s they may perform. In [[Tetris The Grand Master 3 Terror-Instinct|TI]], a player may choose between ''World'' and ''Classic'' rotation styles. ''World'' closely resembles SRS, and ''Classic'' closely resembles the rotation styles of its predecessors [[Tetris The Grand Master|TGM]] and [[Tetris The Absolute The Grand Master 2|TAP]]. [[Henk Rogers]], in his effort to unify all new Tetris games into the Tetris Guideline, required [[Arika]] to include SRS, which is called ''World'' in Ti. SRS traces its routes back to 1991 when [[BPS]] introduced its signature third and fourth [[orientation]]s for the ''S'', ''Z'', and ''I'' tetrominoes in their [[Tetris 2 and Bombliss|Tetris 2+Bombliss]]. Later would come flipped-side-up spawned ''T'', ''L'', and ''J'' tetrominoes and flexible new wall kicks. Probably the most accurate SRS finds itself in BPS's latest games [[Tetris Worlds]] and [[Tetris Deluxe]], which both feature exact same rotation styles. |
| + | ==Spawn Orientation and Location== |
||
| − | ==Description== |
||
| − | All tetrominoes exist inside a bounding square and rotate about the center of this square unless obstructed. Tetrominoes of width 3 (J, L, S, T, Z) are placed in the top two rows of the bounding square and (for J, L, and T) with the flat side down. I is placed in the top middle row. |
||
| + | The spawn orientations are included in the diagram on the right. |
||
| − | All tetrominoes spawn in 2 usually hidden rows at the top of the playfield. They are placed in the center of these rows, rounding to the left. |
||
| + | * All tetrominoes spawn horizontally and wholly above the playfield. |
||
| + | * The ''I'' and ''O'' tetrominoes spawn centrally, and the other, 3-cell wide tetrominoes spawn rounded to the left. |
||
| + | * The ''J'', ''L'' and ''T'' spawn pointing up. |
||
| + | * In Tetris Worlds, the tetrominoes spawn in rows 22 and 23 (or just row 22 in the case of the "I" tetromino), however, in later games the tetrominoes spawn 1 row lower. |
||
| + | ==Basic Rotation== |
||
| − | Once a tetromino lands, it does not lock until the lock delay expires. The lock delay behavior, called [[Infinity]] by the Tetris Company, resets the lock delay whenever the tetromino is moved or rotated. |
||
| + | The basic rotation states are shown in the diagram on the right. |
||
| − | Hard drop is generally mapped to up, which has no lock delay. |
||
| + | Some points to note: |
||
| + | * When unobstructed, the tetrominoes all rotate purely about a single point. These apparent rotation centers are shown as circles in the diagram. |
||
| + | * It is a pure rotation in a mathematical sense, as opposed to the combination of rotation and translation found in other systems such as [[Sega Rotation]] and [[Atari Rotation]]. |
||
| + | * As a direct consequence, the ''J'', ''L'', ''S'', ''T'' and ''Z'' tetrominoes have 1 of their 4 states (the spawn state) in a "floating" position where they are not in contact with the bottom of their [[bounding box]]. |
||
| + | * This allows the bounding box to descend below the surface of the stack (or the floor of the playing field) making it impossible for the tetrominoes to be rotated without the aid of floor kicks. |
||
| + | * The ''S'', ''Z'' and ''I'' tetrominoes have two horizontally oriented states and two vertically oriented states. |
||
| + | * For the "I" and "O" tetrominoes, the apparent rotation center is at the intersection of gridlines, whereas for the "J", "L", "S", "T" and "Z" tetrominoes, the rotation center coincides with the center of one of the four constituent minoes. |
||
| + | ==Wall Kicks== |
||
| − | Wall kicks in SRS are extremely flexible compared to those of earlier games. Some rotations result in new positions that do not overlap the former position at all, allowing for highly controversial T-spin triples (see [[Twist]]). |
||
| + | When the player attempts to rotate a tetromino, but the position it would normally occupy after basic rotation is obstructed, (either by the wall or floor of the playfield, or by the stack), the game will attempt to "kick" the tetromino into an alternative position nearby. |
||
| + | Some points to note: |
||
| + | * When a rotation is attempted, 5 positions are sequentially tested (inclusive of basic rotation); if none are available, the rotation fails completely. |
||
| + | * Which positions are tested is determined by the initial rotation state, and the desired final rotation state. Because it is possible to rotate both clockwise and counter-clockwise, for each of the 4 initial states there are 2 final states. Therefore there are a total of 8 possible rotations for each tetromino and 8 sets of wall kick data need to be described. |
||
| + | * The positions are commonly described as a sequence of <tt>( x, y)</tt> kick values representing translations relative to basic rotation; a convention of positive x rightwards, positive y upwards is used, e.g. <tt>(-1, 2)</tt> would indicate a kick of 1 cell left and 2 cells up. |
||
| + | * The ''J'', ''L'', ''S'', ''T'' and ''Z'' tetrominoes all share the same kick values, the ''I'' tetromino has its own set of kick values, and the ''O'' tetromino does not kick. |
||
| + | * Several different conventions are commonly used for the naming of the rotation states. On this page, the following convention will be used: |
||
| + | **0 = spawn state |
||
| + | **1 = state resulting from a clockwise rotation ("right") from spawn |
||
| + | **2 = state resulting from 2 successive rotations in either direction from spawn. |
||
| + | **3 = state resulting from a counter-clockwise ("left") rotation from spawn |
||
| + | |||
| + | |||
| + | {| border="1" cellspacing="0" |
||
| + | |+'''J, L, S, T, Z Tetromino Wall Kick Data''' |
||
| + | |- align = center |
||
| + | ! width="45"| |
||
| + | ! bgcolor="#80A3F8" width="60"|Test 1 |
||
| + | ! bgcolor="#80A3F8" width="60"|Test 2 |
||
| + | ! bgcolor="#80A3F8" width="60"|Test 3 |
||
| + | ! bgcolor="#80A3F8" width="60"|Test 4 |
||
| + | ! bgcolor="#80A3F8" width="60"|Test 5 |
||
| + | |} |
||
| + | |||
| + | {| border="1" cellspacing="0" |
||
| + | |- align = center |
||
| + | | bgcolor="#80A3F8" width="45"|0>>1 |
||
| + | |width="60"|<tt>( 0, 0)</tt> |
||
| + | |width="60"|<tt>(-1, 0)</tt> |
||
| + | |width="60"|<tt>(-1, 1)</tt> |
||
| + | |width="60"|<tt>( 0,-2)</tt> |
||
| + | |width="60"|<tt>(-1,-2)</tt> |
||
| + | |- align = center |
||
| + | | bgcolor="#80A3F8"|1>>0||<tt>( 0, 0)</tt>||<tt>( 1, 0)</tt>||<tt>( 1,-1)</tt>||<tt>( 0, 2)</tt>||<tt>( 1, 2)</tt> |
||
| + | |} |
||
| + | |||
| + | {| border="1" cellspacing="0" |
||
| + | |- align = center |
||
| + | | bgcolor="#80A3F8" width="45"|1>>2 |
||
| + | |width="60"|<tt>( 0, 0)</tt> |
||
| + | |width="60"|<tt>( 1, 0)</tt> |
||
| + | |width="60"|<tt>( 1,-1)</tt> |
||
| + | |width="60"|<tt>( 0, 2)</tt> |
||
| + | |width="60"|<tt>( 1, 2)</tt> |
||
| + | |- align = center |
||
| + | | bgcolor="#80A3F8"|2>>1||<tt>( 0, 0)</tt>||<tt>(-1, 0)</tt>||<tt>(-1, 1)</tt>||<tt>( 0,-2)</tt>||<tt>(-1,-2)</tt> |
||
| + | |} |
||
| + | |||
| + | {| border="1" cellspacing="0" |
||
| + | |- align = center |
||
| + | | bgcolor="#80A3F8" width="45"|2>>3 |
||
| + | |width="60"|<tt>( 0, 0)</tt> |
||
| + | |width="60"|<tt>( 1, 0)</tt> |
||
| + | |width="60"|<tt>( 1, 1)</tt> |
||
| + | |width="60"|<tt>( 0,-2)</tt> |
||
| + | |width="60"|<tt>( 1,-2)</tt> |
||
| + | |- align = center |
||
| + | | bgcolor="#80A3F8"|3>>2||<tt>( 0, 0)</tt>||<tt>(-1, 0)</tt>||<tt>(-1,-1)</tt>||<tt>( 0, 2)</tt>||<tt>(-1, 2)</tt> |
||
| + | |} |
||
| + | |||
| + | {| border="1" cellspacing="0" |
||
| + | |- align = center |
||
| + | | bgcolor="#80A3F8" width="45"|3>>0 |
||
| + | |width="60"|<tt>( 0, 0)</tt> |
||
| + | |width="60"|<tt>(-1, 0)</tt> |
||
| + | |width="60"|<tt>(-1,-1)</tt> |
||
| + | |width="60"|<tt>( 0, 2)</tt> |
||
| + | |width="60"|<tt>(-1, 2)</tt> |
||
| + | |- align = center |
||
| + | | bgcolor="#80A3F8"|0>>3||<tt>( 0, 0)</tt>||<tt>( 1, 0)</tt>||<tt>( 1, 1)</tt>||<tt>( 0,-2)</tt>||<tt>( 1,-2)</tt> |
||
| + | |} |
||
| + | |||
| + | |||
| + | |||
| + | {| border="1" cellspacing="0" |
||
| + | |+'''I Tetromino Wall Kick Data''' |
||
| + | |- align = center |
||
| + | ! width="45"| |
||
| + | ! bgcolor="#80A3F8" width="60"|Test 1 |
||
| + | ! bgcolor="#80A3F8" width="60"|Test 2 |
||
| + | ! bgcolor="#80A3F8" width="60"|Test 3 |
||
| + | ! bgcolor="#80A3F8" width="60"|Test 4 |
||
| + | ! bgcolor="#80A3F8" width="60"|Test 5 |
||
| + | |} |
||
| + | |||
| + | {| border="1" cellspacing="0" |
||
| + | |- align = center |
||
| + | | bgcolor="#80A3F8" width="45"|0>>1 |
||
| + | |width="60"|<tt>( 0, 0)</tt> |
||
| + | |width="60"|<tt>(-2, 0)</tt> |
||
| + | |width="60"|<tt>( 1, 0)</tt> |
||
| + | |width="60"|<tt>(-2,-1)</tt> |
||
| + | |width="60"|<tt>( 1, 2)</tt> |
||
| + | |- align = center |
||
| + | | bgcolor="#80A3F8"|1>>0||<tt>( 0, 0)</tt>||<tt>( 2, 0)</tt>||<tt>(-1, 0)</tt>||<tt>( 2, 1)</tt>||<tt>(-1,-2)</tt> |
||
| + | |} |
||
| + | |||
| + | {| border="1" cellspacing="0" |
||
| + | |- align = center |
||
| + | | bgcolor="#80A3F8" width="45"|1>>2 |
||
| + | |width="60"|<tt>( 0, 0)</tt> |
||
| + | |width="60"|<tt>(-1, 0)</tt> |
||
| + | |width="60"|<tt>( 2, 0)</tt> |
||
| + | |width="60"|<tt>(-1, 2)</tt> |
||
| + | |width="60"|<tt>( 2,-1)</tt> |
||
| + | |- align = center |
||
| + | | bgcolor="#80A3F8"|2>>1||<tt>( 0, 0)</tt>||<tt>( 1, 0)</tt>||<tt>(-2, 0)</tt>||<tt>( 1,-2)</tt>||<tt>(-2, 1)</tt> |
||
| + | |} |
||
| + | |||
| + | {| border="1" cellspacing="0" |
||
| + | |- align = center |
||
| + | | bgcolor="#80A3F8" width="45"|2>>3 |
||
| + | |width="60"|<tt>( 0, 0)</tt> |
||
| + | |width="60"|<tt>( 2, 0)</tt> |
||
| + | |width="60"|<tt>(-1, 0)</tt> |
||
| + | |width="60"|<tt>( 2, 1)</tt> |
||
| + | |width="60"|<tt>(-1,-2)</tt> |
||
| + | |- align = center |
||
| + | | bgcolor="#80A3F8"|3>>2||<tt>( 0, 0)</tt>||<tt>(-2, 0)</tt>||<tt>( 1, 0)</tt>||<tt>(-2,-1)</tt>||<tt>( 1, 2)</tt> |
||
| + | |} |
||
| + | |||
| + | {| border="1" cellspacing="0" |
||
| + | |- align = center |
||
| + | | bgcolor="#80A3F8" width="45"|3>>0 |
||
| + | |width="60"|<tt>( 0, 0)</tt> |
||
| + | |width="60"|<tt>( 1, 0)</tt> |
||
| + | |width="60"|<tt>(-2, 0)</tt> |
||
| + | |width="60"|<tt>( 1,-2)</tt> |
||
| + | |width="60"|<tt>(-2, 1)</tt> |
||
| + | |- align = center |
||
| + | | bgcolor="#80A3F8"|0>>3||<tt>( 0, 0)</tt>||<tt>(-1, 0)</tt>||<tt>( 2, 0)</tt>||<tt>(-1, 2)</tt>||<tt>( 2,-1)</tt> |
||
| + | |} |
||
==20G== |
==20G== |
||
| − | Since Henk Rogers has not been directly involved with a game boasting 20G aside from [[Tetris Zone]], certain behaviors are |
+ | Since Henk Rogers has not been directly involved with a game boasting [[20G]] aside from [[Tetris Zone]], and the guideline Marathon mode only reaches 2.36G (same as ''Tetris Worlds''), certain behaviors are undefined in the Tetris Guideline. ''Tetris Worlds'' reaches only 2.36G. ''Minna no Soft Series: Tetris Advance'' was the first game to feature SRS and 20G. TGM3 and TGM ACE are the second and third, and ''[[Tetris DS]]'' (TDS) is the fourth. Though the rotations are identical, these games have different mobility restrictions due to their different order of processing events in between frames. |
In this example, Left is being held and then a clockwise rotation is initiated. |
In this example, Left is being held and then a clockwise rotation is initiated. |
||
{| |
{| |
||
| ⚫ | |||
| − | |{{pfstart}} |
||
| ⚫ | |||
| ⚫ | |||
{{pfrow|G|G|L| | | | | | | |}} |
{{pfrow|G|G|L| | | | | | | |}} |
||
{{pfrow|G|G|G| | | | | | | |}} |
{{pfrow|G|G|G| | | | | | | |}} |
||
{{pfend}} |
{{pfend}} |
||
| ⚫ | |||
| − | |{{pfstart}} |
||
| ⚫ | |||
| ⚫ | |||
{{pfrow|G|G| |L| | | | | | |}} |
{{pfrow|G|G| |L| | | | | | |}} |
||
{{pfrow|G|G|G| | | | | | | |}} |
{{pfrow|G|G|G| | | | | | | |}} |
||
| Line 32: | Line 169: | ||
|} |
|} |
||
| − | The above example ends mid-frame |
+ | The above example ends mid-frame. So the figure on the right is never actually rendered. It simply represents the internal game status after rotation has been processed. |
| − | Now, if the game processes movement followed by gravity, the following scenario will happen (as found in TGM3, TGMA and Tetris Zone). |
+ | Now, if the game processes movement followed by gravity, the following scenario will happen (as found in TGM3, TGMA and Tetris Zone). This is most likely the result of the relatively fast DAS. |
{| |
{| |
||
| ⚫ | |||
| − | |{{pfstart}} |
||
| ⚫ | |||
| − | {{pfrow|G|G| |L| | | | | | |}} |
||
{{pfrow|G|G| |L| | | | | | |}} |
{{pfrow|G|G| |L| | | | | | |}} |
||
{{pfrow|G|G|G| | | | | | | |}} |
{{pfrow|G|G|G| | | | | | | |}} |
||
{{pfend}} |
{{pfend}} |
||
| ⚫ | |||
| − | |{{pfstart}} |
||
| ⚫ | |||
| − | {{pfrow|G|G|L| | | | | | | |}} |
||
{{pfrow|G|G|L| | | | | | | |}} |
{{pfrow|G|G|L| | | | | | | |}} |
||
{{pfrow|G|G|G| | | | | | | |}} |
{{pfrow|G|G|G| | | | | | | |}} |
||
| Line 52: | Line 185: | ||
On the other hand, if gravity is processed next, the following scenario will happen (as found in TDS). This could be the result of either movement processed after gravity, movement processed before rotation, or (most likely in the case of TDS) movement occurring one or more frames after both rotation and gravity due to slow [[DAS]]. |
On the other hand, if gravity is processed next, the following scenario will happen (as found in TDS). This could be the result of either movement processed after gravity, movement processed before rotation, or (most likely in the case of TDS) movement occurring one or more frames after both rotation and gravity due to slow [[DAS]]. |
||
{| |
{| |
||
| ⚫ | |||
| − | |{{pfstart}} |
||
| − | {{pfrow| | |L|L| | | | | | |}} |
||
| − | {{pfrow|G|G| |L| | | | | | |}} |
||
{{pfrow|G|G| |L| | | | | | |}} |
{{pfrow|G|G| |L| | | | | | |}} |
||
{{pfrow|G|G|G| | | | | | | |}} |
{{pfrow|G|G|G| | | | | | | |}} |
||
{{pfend}} |
{{pfend}} |
||
| ⚫ | |||
| − | |{{pfstart}} |
||
| − | {{pfrow| | | | | | | | | | |}} |
||
| − | {{pfrow|G|G|L|L| | | | | | |}} |
||
{{pfrow|G|G| |L| | | | | | |}} |
{{pfrow|G|G| |L| | | | | | |}} |
||
{{pfrow|G|G|G|L| | | | | | |}} |
{{pfrow|G|G|G|L| | | | | | |}} |
||
| Line 67: | Line 196: | ||
==External links== |
==External links== |
||
| − | *[http://www.tetrisconcept.com/tdsg.txt Tetris DS Systems Guide] |
+ | *[http://www.tetrisconcept.com/tdsg.txt Tetris DS Systems Guide (dead link)] |
| ⚫ | |||
| − | *[http://epictetris2.ytmnd.com/ T-SPIN] |
||
| ⚫ | |||
| − | |||
| − | |||
| − | [[Category:Game Mechanics]] |
||
| − | [[Category:Gameplay Components]] |
||
[[Category:Rotation Systems]] |
[[Category:Rotation Systems]] |
||
Revision as of 23:47, 6 October 2019
All rotation states of all seven tetrominoes. From top to bottom: I, J, L, O, S, T, Z. The circle doesn't appear in the game; it helps to illustrate the axis on which each tetromino rotates.
Super Rotation System, or SRS is the current Tetris Guideline standard for how tetrominoes behave, in a broad sense. SRS represents where and how tetrominoes spawn, how they rotate, and what wall kicks they may perform. In TI, a player may choose between World and Classic rotation styles. World closely resembles SRS, and Classic closely resembles the rotation styles of its predecessors TGM and TAP. Henk Rogers, in his effort to unify all new Tetris games into the Tetris Guideline, required Arika to include SRS, which is called World in Ti. SRS traces its routes back to 1991 when BPS introduced its signature third and fourth orientations for the S, Z, and I tetrominoes in their Tetris 2+Bombliss. Later would come flipped-side-up spawned T, L, and J tetrominoes and flexible new wall kicks. Probably the most accurate SRS finds itself in BPS's latest games Tetris Worlds and Tetris Deluxe, which both feature exact same rotation styles.
Spawn Orientation and Location
The spawn orientations are included in the diagram on the right.
- All tetrominoes spawn horizontally and wholly above the playfield.
- The I and O tetrominoes spawn centrally, and the other, 3-cell wide tetrominoes spawn rounded to the left.
- The J, L and T spawn pointing up.
- In Tetris Worlds, the tetrominoes spawn in rows 22 and 23 (or just row 22 in the case of the "I" tetromino), however, in later games the tetrominoes spawn 1 row lower.
Basic Rotation
The basic rotation states are shown in the diagram on the right. Some points to note:
- When unobstructed, the tetrominoes all rotate purely about a single point. These apparent rotation centers are shown as circles in the diagram.
- It is a pure rotation in a mathematical sense, as opposed to the combination of rotation and translation found in other systems such as Sega Rotation and Atari Rotation.
- As a direct consequence, the J, L, S, T and Z tetrominoes have 1 of their 4 states (the spawn state) in a "floating" position where they are not in contact with the bottom of their bounding box.
- This allows the bounding box to descend below the surface of the stack (or the floor of the playing field) making it impossible for the tetrominoes to be rotated without the aid of floor kicks.
- The S, Z and I tetrominoes have two horizontally oriented states and two vertically oriented states.
- For the "I" and "O" tetrominoes, the apparent rotation center is at the intersection of gridlines, whereas for the "J", "L", "S", "T" and "Z" tetrominoes, the rotation center coincides with the center of one of the four constituent minoes.
Wall Kicks
When the player attempts to rotate a tetromino, but the position it would normally occupy after basic rotation is obstructed, (either by the wall or floor of the playfield, or by the stack), the game will attempt to "kick" the tetromino into an alternative position nearby. Some points to note:
- When a rotation is attempted, 5 positions are sequentially tested (inclusive of basic rotation); if none are available, the rotation fails completely.
- Which positions are tested is determined by the initial rotation state, and the desired final rotation state. Because it is possible to rotate both clockwise and counter-clockwise, for each of the 4 initial states there are 2 final states. Therefore there are a total of 8 possible rotations for each tetromino and 8 sets of wall kick data need to be described.
- The positions are commonly described as a sequence of ( x, y) kick values representing translations relative to basic rotation; a convention of positive x rightwards, positive y upwards is used, e.g. (-1, 2) would indicate a kick of 1 cell left and 2 cells up.
- The J, L, S, T and Z tetrominoes all share the same kick values, the I tetromino has its own set of kick values, and the O tetromino does not kick.
- Several different conventions are commonly used for the naming of the rotation states. On this page, the following convention will be used:
- 0 = spawn state
- 1 = state resulting from a clockwise rotation ("right") from spawn
- 2 = state resulting from 2 successive rotations in either direction from spawn.
- 3 = state resulting from a counter-clockwise ("left") rotation from spawn
| Test 1 | Test 2 | Test 3 | Test 4 | Test 5 |
|---|
| 0>>1 | ( 0, 0) | (-1, 0) | (-1, 1) | ( 0,-2) | (-1,-2) |
| 1>>0 | ( 0, 0) | ( 1, 0) | ( 1,-1) | ( 0, 2) | ( 1, 2) |
| 1>>2 | ( 0, 0) | ( 1, 0) | ( 1,-1) | ( 0, 2) | ( 1, 2) |
| 2>>1 | ( 0, 0) | (-1, 0) | (-1, 1) | ( 0,-2) | (-1,-2) |
| 2>>3 | ( 0, 0) | ( 1, 0) | ( 1, 1) | ( 0,-2) | ( 1,-2) |
| 3>>2 | ( 0, 0) | (-1, 0) | (-1,-1) | ( 0, 2) | (-1, 2) |
| 3>>0 | ( 0, 0) | (-1, 0) | (-1,-1) | ( 0, 2) | (-1, 2) |
| 0>>3 | ( 0, 0) | ( 1, 0) | ( 1, 1) | ( 0,-2) | ( 1,-2) |
| Test 1 | Test 2 | Test 3 | Test 4 | Test 5 |
|---|
| 0>>1 | ( 0, 0) | (-2, 0) | ( 1, 0) | (-2,-1) | ( 1, 2) |
| 1>>0 | ( 0, 0) | ( 2, 0) | (-1, 0) | ( 2, 1) | (-1,-2) |
| 1>>2 | ( 0, 0) | (-1, 0) | ( 2, 0) | (-1, 2) | ( 2,-1) |
| 2>>1 | ( 0, 0) | ( 1, 0) | (-2, 0) | ( 1,-2) | (-2, 1) |
| 2>>3 | ( 0, 0) | ( 2, 0) | (-1, 0) | ( 2, 1) | (-1,-2) |
| 3>>2 | ( 0, 0) | (-2, 0) | ( 1, 0) | (-2,-1) | ( 1, 2) |
| 3>>0 | ( 0, 0) | ( 1, 0) | (-2, 0) | ( 1,-2) | (-2, 1) |
| 0>>3 | ( 0, 0) | (-1, 0) | ( 2, 0) | (-1, 2) | ( 2,-1) |
20G
Since Henk Rogers has not been directly involved with a game boasting 20G aside from Tetris Zone, and the guideline Marathon mode only reaches 2.36G (same as Tetris Worlds), certain behaviors are undefined in the Tetris Guideline. Tetris Worlds reaches only 2.36G. Minna no Soft Series: Tetris Advance was the first game to feature SRS and 20G. TGM3 and TGM ACE are the second and third, and Tetris DS (TDS) is the fourth. Though the rotations are identical, these games have different mobility restrictions due to their different order of processing events in between frames.
In this example, Left is being held and then a clockwise rotation is initiated.
|
|
|
The above example ends mid-frame. So the figure on the right is never actually rendered. It simply represents the internal game status after rotation has been processed.
Now, if the game processes movement followed by gravity, the following scenario will happen (as found in TGM3, TGMA and Tetris Zone). This is most likely the result of the relatively fast DAS.
|
|
|
On the other hand, if gravity is processed next, the following scenario will happen (as found in TDS). This could be the result of either movement processed after gravity, movement processed before rotation, or (most likely in the case of TDS) movement occurring one or more frames after both rotation and gravity due to slow DAS.
|
|
|
External links
- Tetris DS Systems Guide (dead link)
- Jaragochi's analysis of SRS wallkicks (Wayback Machine archived)