No edit summary |
(promote to width6row2) |
||
| (10 intermediate revisions by 8 users not shown) | |||
| Line 1: | Line 1: | ||
Originally written by Rosti LFC on NSider (with thanks to Sully/CRAIGSS). Moved here and updated. |
Originally written by Rosti LFC on NSider (with thanks to Sully/CRAIGSS). Moved here and updated. |
||
| − | == What Is A T-Spin? == |
+ | == What Is A T-Spin? == |
[[Tetris DS]] is not the only game to acknowledge [[T-Spins]], but other games have different criteria for what a T-Spin is. This is what Tetris DS uses to identify a T-Spin: |
[[Tetris DS]] is not the only game to acknowledge [[T-Spins]], but other games have different criteria for what a T-Spin is. This is what Tetris DS uses to identify a T-Spin: |
||
| Line 9: | Line 9: | ||
Imagine the four rotations in a 3x3 box like this: |
Imagine the four rotations in a 3x3 box like this: |
||
{| |
{| |
||
| − | |{{pfstart}} |
+ | |{{pfstart}}{{width3row2| |T| }} |
| − | {{ |
+ | {{width3row2|T|T|T}} |
| − | {{ |
+ | {{width3row2| | | }} |
| − | {{width3row| | | }} |
||
{{pfend}} |
{{pfend}} |
||
| − | |{{pfstart}} |
+ | |{{pfstart}}{{width3row2| |T| }} |
| − | {{ |
+ | {{width3row2| |T|T}} |
| − | {{ |
+ | {{width3row2| |T| }} |
| − | {{width3row| |T| }} |
||
{{pfend}} |
{{pfend}} |
||
| − | |{{pfstart}} |
+ | |{{pfstart}}{{width3row2| | | }} |
| − | {{ |
+ | {{width3row2|T|T|T}} |
| − | {{ |
+ | {{width3row2| |T| }} |
| − | {{width3row| |T| }} |
||
{{pfend}} |
{{pfend}} |
||
| − | |{{pfstart}} |
+ | |{{pfstart}}{{width3row2| |T| }} |
| − | {{ |
+ | {{width3row2|T|T| }} |
| − | {{ |
+ | {{width3row2| |T| }} |
| − | {{width3row| |T| }} |
||
{{pfend}} |
{{pfend}} |
||
|} |
|} |
||
| − | |||
For the rotation to be considered a T-Spin by the game, three of the four corners must be occupied. Here are some examples: |
For the rotation to be considered a T-Spin by the game, three of the four corners must be occupied. Here are some examples: |
||
{| |
{| |
||
| − | |{{pfstart}} |
+ | |{{pfstart}}{{width3row2| |P|g}} |
| − | {{ |
+ | {{width3row2|P|P|P}} |
| − | {{ |
+ | {{width3row2|g| |g}} |
| − | {{width3row|g| |g}} |
||
{{pfend}} |
{{pfend}} |
||
| − | |{{pfstart}} |
+ | |{{pfstart}}{{width3row2| |P|g}} |
| − | {{ |
+ | {{width3row2| |P|P}} |
| − | {{ |
+ | {{width3row2|g|P|g}} |
| − | {{width3row|g|P|g}} |
||
{{pfend}} |
{{pfend}} |
||
| − | |{{pfstart}} |
+ | |{{pfstart}}{{width3row2|g| |g}} |
| − | {{ |
+ | {{width3row2|P|P|P}} |
| − | {{ |
+ | {{width3row2| |P|g}} |
| − | {{width3row| |P|g}} |
||
{{pfend}} |
{{pfend}} |
||
|} |
|} |
||
| Line 53: | Line 45: | ||
All of these would be classed as T-Spins by the game, and a box would flash 'T-Spin' on the right of the playing field, confirming so. |
All of these would be classed as T-Spins by the game, and a box would flash 'T-Spin' on the right of the playing field, confirming so. |
||
The fact that the system works like this allows for some moves which shouldn't be T-spins: |
The fact that the system works like this allows for some moves which shouldn't be T-spins: |
||
| − | |||
{| |
{| |
||
| − | |{{pfstart}} |
+ | |{{pfstart}}{{width6row2| |g| | | | }} |
| − | {{ |
+ | {{width6row2|g|g| | | |g}} |
| − | {{ |
+ | {{width6row2|g|g| |g|g|g}} |
| ⚫ | |||
{{pfend}} |
{{pfend}} |
||
| − | |{{pfstart}} |
+ | |{{pfstart}}{{width6row2| |g| |T| | }} |
| − | {{ |
+ | {{width6row2|g|g|T|T|T|g}} |
| − | {{ |
+ | {{width6row2|g|g| |g|g|g}} |
| − | {{width6row|g|g| |g|g|g}} |
||
{{pfend}} |
{{pfend}} |
||
| − | |{{pfstart}} |
+ | |{{pfstart}}{{width6row2| |g|P| | | }} |
| − | {{ |
+ | {{width6row2|g|g|P|P| |g}} |
| − | {{ |
+ | {{width6row2|g|g|P|g|g|g}} |
| − | {{width6row|g|g|P|g|g|g}} |
||
{{pfend}} |
{{pfend}} |
||
|} |
|} |
||
| Line 75: | Line 63: | ||
{| |
{| |
||
| − | |{{pfstart}} |
+ | |{{pfstart}}{{width6row2|G|G| | |G|G}} |
| − | {{ |
+ | {{width6row2|G|G| | | |G}} |
| − | {{ |
+ | {{width6row2|g|g| | |G|g}} |
| − | {{ |
+ | {{width6row2|g|g| |g|g|g}} |
| − | {{width6row|g|g| |g|g|g}} |
||
{{pfend}} |
{{pfend}} |
||
| − | |{{pfstart}} |
+ | |{{pfstart}}{{width6row2|G|G| |T|G|G}} |
| − | {{ |
+ | {{width6row2|G|G|T|T| |G}} |
| − | {{ |
+ | {{width6row2|g|g| |T|G|g}} |
| − | {{ |
+ | {{width6row2|g|g| |g|g|g}} |
| − | {{width6row|g|g| |g|g|g}} |
||
{{pfend}} |
{{pfend}} |
||
| − | |{{pfstart}} |
+ | |{{pfstart}}{{width6row2|G|G| | |G|G}} |
| − | {{ |
+ | {{width6row2|G|G|T|T|T|G}} |
| − | {{ |
+ | {{width6row2|g|g| |T|G|g}} |
| − | {{ |
+ | {{width6row2|g|g| |g|g|g}} |
| − | {{width6row|g|g| |g|g|g}} |
||
{{pfend}} |
{{pfend}} |
||
|} |
|} |
||
| Line 100: | Line 85: | ||
{| |
{| |
||
| − | |{{pfstart}} |
+ | |{{pfstart}}{{width6row2| | | | | | }} |
| − | {{ |
+ | {{width6row2| | | | | | }} |
| − | {{ |
+ | {{width6row2| | | | |G|g}} |
| − | {{ |
+ | {{width6row2|G|G| | | |G}} |
| − | {{ |
+ | {{width6row2|g|g|G| |G|g}} |
| − | {{width6row|g|g|G| |G|g}} |
||
{{pfend}} |
{{pfend}} |
||
| − | |{{pfstart}} |
+ | |{{pfstart}}{{width6row2| | | | |G|G}} |
| − | {{ |
+ | {{width6row2| | | | | |G}} |
| − | {{ |
+ | {{width6row2|G|G|G|G| |g}} |
| − | {{ |
+ | {{width6row2|G|G|G| | |G}} |
| − | {{ |
+ | {{width6row2|g|g|G|G| |g}} |
| − | {{width6row|g|g|G|G| |g}} |
||
{{pfend}} |
{{pfend}} |
||
|} |
|} |
||
| − | |||
It is helpful to know these setups and to be able to recognise them. This allows you to make them with improvisation (rather than by following certain setups), converting a possibly awful field into a very beneficial one. |
It is helpful to know these setups and to be able to recognise them. This allows you to make them with improvisation (rather than by following certain setups), converting a possibly awful field into a very beneficial one. |
||
| Line 124: | Line 106: | ||
===[[ST Stacking|The 'ST' Setup]]=== |
===[[ST Stacking|The 'ST' Setup]]=== |
||
| − | The main benefit to this setup is that it can allow the use of T-spin doubles indefinitely. In practice however, it is usually not quite that simple. The main shape requires a continuous back-to-back t-spin triple setup (two blocks, gap, two blocks, gap etc.) which is |
+ | The main benefit to this setup is that it can allow the use of T-spin doubles indefinitely. In practice however, it is usually not quite that simple. The main shape requires a continuous back-to-back t-spin triple setup (two blocks, gap, two blocks, gap etc.) which is three blocks away from the wall of the playing field. This shape needs to be built without using S or T blocks, as they are needed to complete the doubles. Here is a basic portrayal of how it works: |
| − | |||
{| |
{| |
||
|{{pfstart}} |
|{{pfstart}} |
||
| Line 143: | Line 124: | ||
{{pfrow| | | |G|G|G|G|G|G|g}} |
{{pfrow| | | |G|G|G|G|G|G|g}} |
||
{{pfend}} |
{{pfend}} |
||
| − | |{{pfstart}} |
+ | |{{pfstart}}{{pfrow| | | | |G|G|G|g|g|g}} |
| − | {{pfrow| | | | |G|G|G|g|g|g}} |
||
{{pfrow| | | |G|G|G|G|G|G|g}} |
{{pfrow| | | |G|G|G|G|G|G|g}} |
||
{{pfrow| | | |G|G|G|G|G|G|g}} |
{{pfrow| | | |G|G|G|G|G|G|g}} |
||
| Line 159: | Line 139: | ||
{{pfrow|L|L| |G|G|G|G|G|G|g}} |
{{pfrow|L|L| |G|G|G|G|G|G|g}} |
||
{{pfend}} |
{{pfend}} |
||
| − | |{{pfstart}} |
+ | |{{pfstart}}{{pfrow| | | | |G|G|G|g|g|g}} |
| − | {{pfrow| | | | |G|G|G|g|g|g}} |
||
{{pfrow| | | |G|G|G|G|G|G|g}} |
{{pfrow| | | |G|G|G|G|G|G|g}} |
||
{{pfrow| | | |G|G|G|G|G|G|g}} |
{{pfrow| | | |G|G|G|G|G|G|g}} |
||
| Line 175: | Line 154: | ||
{{pfrow|L|L|P|G|G|G|G|G|G|g}} |
{{pfrow|L|L|P|G|G|G|G|G|G|g}} |
||
{{pfend}} |
{{pfend}} |
||
| − | |{{pfstart}} |
+ | |{{pfstart}}{{pfrow| | | | | | | | | | }} |
| ⚫ | |||
{{pfrow| | | | | | | | | | }} |
{{pfrow| | | | | | | | | | }} |
||
{{pfrow| | | | |G|G|G|g|g|g}} |
{{pfrow| | | | |G|G|G|g|g|g}} |
||
| Line 184: | Line 162: | ||
{{pfrow| | | |G|G|G|G|G|G|g}} |
{{pfrow| | | |G|G|G|G|G|G|g}} |
||
{{pfrow| | | |G|G|G|G|G|G|g}} |
{{pfrow| | | |G|G|G|G|G|G|g}} |
||
| − | {{pfrow| | | | |G|G|G| |
+ | {{pfrow| | | | |G|G|G|G|G|g}} |
| − | {{pfrow| | | |G|G|G|G|G|G|g}} |
||
{{pfrow| | | |G|G|G|G|G|G|g}} |
{{pfrow| | | |G|G|G|G|G|G|g}} |
||
| ⚫ | |||
{{pfrow|S| | | |G|G|G|g|g|g}} |
{{pfrow|S| | | |G|G|G|g|g|g}} |
||
{{pfrow|S|S| |G|G|G|G|G|G|g}} |
{{pfrow|S|S| |G|G|G|G|G|G|g}} |
||
| Line 371: | Line 349: | ||
{{pfrow|L|L| |G|G|G|G|G|G|g}} |
{{pfrow|L|L| |G|G|G|G|G|G|g}} |
||
{{pfend}} |
{{pfend}} |
||
| − | |} |
+ | |} |
Another advantage of this setup (which isn't shown in the above images) is that lines can be cleared while constructing the field. Back-to-back T-spin triple setups require you to create the shape, and then clear the lines with t-spins, meaning your stack can get dangerously high. The S/T setup allows you to clear lines with T-spins, as you go along. |
Another advantage of this setup (which isn't shown in the above images) is that lines can be cleared while constructing the field. Back-to-back T-spin triple setups require you to create the shape, and then clear the lines with t-spins, meaning your stack can get dangerously high. The S/T setup allows you to clear lines with T-spins, as you go along. |
||
| Line 381: | Line 359: | ||
PROS: They allow you to send huge amounts of garbage in a small timeframe (2 pieces). They also send more garbage per line cleared than Tetrises, so you can send lines quicker because you don't need to place as many pieces down. |
PROS: They allow you to send huge amounts of garbage in a small timeframe (2 pieces). They also send more garbage per line cleared than Tetrises, so you can send lines quicker because you don't need to place as many pieces down. |
||
| − | CONS: Standard setups can be tricky to do quickly, and against a good opponent, it is likely you will have recieved enough garbage to kill you before you can pull off the maneouver. Another disadvantage is that the setups are easily ruined by mistakes or banana items, and the playing field you will be left with will be pretty awful. |
+ | CONS: Standard setups can be tricky to do quickly, and against a good opponent, it is likely you will have recieved enough garbage to kill you before you can pull off the maneouver. Another disadvantage is that the setups are easily ruined by mistakes or banana items, and the playing field you will be left with will be pretty awful. Also you may not always get the T piece resulting your pieces to pile up really high. |
The secret of t-spins in multiplayer is not to be able to set them up, but to be able to see how a small manipulation of the playing field will create the opportunity for one. |
The secret of t-spins in multiplayer is not to be able to set them up, but to be able to see how a small manipulation of the playing field will create the opportunity for one. |
||
| Line 390: | Line 368: | ||
{| |
{| |
||
| − | |{{pfstart}} |
+ | |{{pfstart}}{{pfrow| | | | | | | | | | }} |
| ⚫ | |||
{{pfrow| | | | | | | | | | }} |
{{pfrow| | | | | | | | | | }} |
||
{{pfrow|G|G|G| | | | | |G|g}} |
{{pfrow|G|G|G| | | | | |G|g}} |
||
| Line 401: | Line 378: | ||
{{pfrow|G|G|G|G|G|G|G| |G|g}} |
{{pfrow|G|G|G|G|G|G|G| |G|g}} |
||
{{pfend}} |
{{pfend}} |
||
| − | |{{pfstart}} |
+ | |{{pfstart}}{{width3row2|J| | }} |
| − | {{ |
+ | {{width3row2|J|J|J}} |
| − | {{width3row|J|J|J}} |
||
{{pfend}} |
{{pfend}} |
||
| − | |{{pfstart}} |
+ | |{{pfstart}}{{width3row2|Z|Z| }} |
| − | {{ |
+ | {{width3row2| |Z|Z}} |
| − | {{width3row| |Z|Z}} |
||
{{pfend}} |
{{pfend}} |
||
| − | |{{pfstart}} |
+ | |{{pfstart}}{{width3row2| | |L}} |
| − | {{ |
+ | {{width3row2|L|L|L}} |
| − | {{width3row|L|L|L}} |
||
{{pfend}} |
{{pfend}} |
||
|} |
|} |
||
| Line 418: | Line 392: | ||
{| |
{| |
||
| − | |{{pfstart}} |
+ | |{{pfstart}}{{pfrow| |L|L|L| | | | | | }} |
| − | {{pfrow| |L|L|L| | | | | | }} |
||
{{pfrow| |L|Z|Z| | | | | | }} |
{{pfrow| |L|Z|Z| | | | | | }} |
||
{{pfrow|G|G|G|Z|Z| | | |G|g}} |
{{pfrow|G|G|G|Z|Z| | | |G|g}} |
||
| Line 429: | Line 402: | ||
{{pfrow|G|G|G|G|G|G|G| |G|g}} |
{{pfrow|G|G|G|G|G|G|G| |G|g}} |
||
{{pfend}} |
{{pfend}} |
||
| − | |{{pfstart}} |
+ | |{{pfstart}}{{pfrow| |L|L|L| | | | | | }} |
| − | {{pfrow| |L|L|L| | | | | | }} |
||
{{pfrow| |L|Z|Z| | | | | | }} |
{{pfrow| |L|Z|Z| | | | | | }} |
||
{{pfrow|G|G|G|Z|Z| | | |G|g}} |
{{pfrow|G|G|G|Z|Z| | | |G|g}} |
||
| Line 445: | Line 417: | ||
{| |
{| |
||
| − | |{{pfstart}} |
+ | |{{pfstart}}{{pfrow| | | | |Z| | | | |L}} |
| − | {{pfrow| | | | |Z| | | | |L}} |
||
{{pfrow| | | |Z|Z| | |L|L|L}} |
{{pfrow| | | |Z|Z| | |L|L|L}} |
||
{{pfrow|G|G|G|Z|J| | | |G|g}} |
{{pfrow|G|G|G|Z|J| | | |G|g}} |
||
| Line 456: | Line 427: | ||
{{pfrow|G|G|G|G|G|G|G| |G|g}} |
{{pfrow|G|G|G|G|G|G|G| |G|g}} |
||
{{pfend}} |
{{pfend}} |
||
| − | |{{pfstart}} |
+ | |{{pfstart}}{{pfrow| | | | |Z|T| | | |L}} |
| − | {{pfrow| | | | |Z|T| | | |L}} |
||
{{pfrow| | | |Z|Z|T|T|L|L|L}} |
{{pfrow| | | |Z|Z|T|T|L|L|L}} |
||
{{pfrow|G|G|G|Z|J|T| | |G|g}} |
{{pfrow|G|G|G|Z|J|T| | |G|g}} |
||
| Line 467: | Line 437: | ||
{{pfrow|G|G|G|G|G|G|G| |G|g}} |
{{pfrow|G|G|G|G|G|G|G| |G|g}} |
||
{{pfend}} |
{{pfend}} |
||
| − | |{{pfstart}} |
+ | |{{pfstart}}{{pfrow| | | | |Z| | | | |L}} |
| − | {{pfrow| | | | |Z| | | | |L}} |
||
{{pfrow| | | |Z|Z| |T|L|L|L}} |
{{pfrow| | | |Z|Z| |T|L|L|L}} |
||
{{pfrow|G|G|G|Z|J|T|T|T|G|g}} |
{{pfrow|G|G|G|Z|J|T|T|T|G|g}} |
||
| Line 478: | Line 447: | ||
{{pfrow|G|G|G|G|G|G|G| |G|g}} |
{{pfrow|G|G|G|G|G|G|G| |G|g}} |
||
{{pfend}} |
{{pfend}} |
||
| − | |{{pfstart}} |
+ | |{{pfstart}}{{pfrow| | | | |Z| | | | |L}} |
| − | {{pfrow| | | | |Z| | | | |L}} |
||
{{pfrow| | | |Z|Z| | |L|L|L}} |
{{pfrow| | | |Z|Z| | |L|L|L}} |
||
{{pfrow|G|G|G|Z|J| | | |G|g}} |
{{pfrow|G|G|G|Z|J| | | |G|g}} |
||
| Line 491: | Line 459: | ||
|} |
|} |
||
| − | And voila! Six |
+ | And voila! Six garbage lines are sent to your opponent if you get a t-piece. The field also requires little work to get back on to Tetrises (possibly a J-piece on the left and a square in the centre). This is the best way to use t-spins online against opponents - not by knowing how to set them up from the start, but by seeing how you can quickly create one halfway through a game. |
===Using [[T-Spin Double Setups|Doubles]]=== |
===Using [[T-Spin Double Setups|Doubles]]=== |
||
| Line 498: | Line 466: | ||
{| |
{| |
||
| − | |{{pfstart}} |
+ | |{{pfstart}}{{width6row2| | | | |G|G}} |
| − | {{ |
+ | {{width6row2|g|G| | | |g}} |
| − | {{ |
+ | {{width6row2|g|g|G| |g|g}} |
| − | {{width6row|g|g|G| |g|g}} |
||
{{pfend}} |
{{pfend}} |
||
|} |
|} |
||
| Line 508: | Line 475: | ||
{| |
{| |
||
| − | |{{pfstart}} |
+ | |{{pfstart}}{{width6row2| | | | | | }} |
| − | {{ |
+ | {{width6row2| | |I|I|I|I}} |
| − | {{ |
+ | {{width6row2| | | |G|G|g}} |
| − | {{ |
+ | {{width6row2|g| |G|G|g|g}} |
| − | {{width6row|g| |G|G|g|g}} |
||
{{pfend}} |
{{pfend}} |
||
| − | |{{pfstart}} |
+ | |{{pfstart}}{{width6row2| | | | | | }} |
| − | {{ |
+ | {{width6row2| | | |J|J|J}} |
| − | {{ |
+ | {{width6row2|g| | | |G|J}} |
| − | {{ |
+ | {{width6row2|g|g| |G|g|g}} |
| − | {{width6row|g|g| |G|g|g}} |
||
{{pfend}} |
{{pfend}} |
||
| − | |{{pfstart}} |
+ | |{{pfstart}}{{width6row2| | | | | | }} |
| − | {{ |
+ | {{width6row2| | | |L|L|G}} |
| − | {{ |
+ | {{width6row2|g| | | |L|G}} |
| − | {{ |
+ | {{width6row2|g|g| |G|L|g}} |
| − | {{width6row|g|g| |G|L|g}} |
||
{{pfend}} |
{{pfend}} |
||
| − | |{{pfstart}} |
+ | |{{pfstart}}{{width6row2| | | |S| | }} |
| − | {{ |
+ | {{width6row2| | | |S|S|G}} |
| − | {{ |
+ | {{width6row2|g| | | |S|G}} |
| − | {{ |
+ | {{width6row2|g|g| |G|G|g}} |
| − | {{width6row|g|g| |G|G|g}} |
||
{{pfend}} |
{{pfend}} |
||
| − | |{{pfstart}} |
+ | |{{pfstart}}{{width6row2| | | | | | }} |
| − | {{ |
+ | {{width6row2| | | |T|T|T}} |
| − | {{ |
+ | {{width6row2|g| | | |T|G}} |
| − | {{ |
+ | {{width6row2|g|g| |G|G|g}} |
| − | {{width6row|g|g| |G|G|g}} |
||
{{pfend}} |
{{pfend}} |
||
| − | |{{pfstart}} |
+ | |{{pfstart}}{{width6row2| | | | | | }} |
| − | {{ |
+ | {{width6row2| | | |Z|Z| }} |
| − | {{ |
+ | {{width6row2|g| | | |Z|Z}} |
| − | {{ |
+ | {{width6row2|g|g| |G|G|g}} |
| − | {{width6row|g|g| |G|G|g}} |
||
{{pfend}} |
{{pfend}} |
||
| − | |{{pfstart}} |
+ | |{{pfstart}}{{width6row2| | | |O|O| }} |
| − | {{ |
+ | {{width6row2| | | |O|O| }} |
| − | {{ |
+ | {{width6row2|g| | | |G|G}} |
| − | {{ |
+ | {{width6row2|g|g| |G|G|g}} |
| − | {{width6row|g|g| |G|G|g}} |
||
{{pfend}} |
{{pfend}} |
||
|} |
|} |
||
| − | |||
As you can see, it is possible to use every piece to make a setup,and unlike T-Spin Triples, the opportunities arise often if you can spot them (usually only needing one or two pieces), without you even trying to set them up. |
As you can see, it is possible to use every piece to make a setup,and unlike T-Spin Triples, the opportunities arise often if you can spot them (usually only needing one or two pieces), without you even trying to set them up. |
||
Before attempting doubles it is best to take a second to glance up to your next pieces to make sure that the t-piece is in your next seven blocks. If it isn't, then forget about it, because it will take too much time and you will have to stack around the setup while waiting for the right piece, leaving you with an unbalanced field afterwards, which will take time to fix. |
Before attempting doubles it is best to take a second to glance up to your next pieces to make sure that the t-piece is in your next seven blocks. If it isn't, then forget about it, because it will take too much time and you will have to stack around the setup while waiting for the right piece, leaving you with an unbalanced field afterwards, which will take time to fix. |
||
===Other Setups=== |
===Other Setups=== |
||
| − | ''See also: [[T-Spin methods]]'' |
||
There are several other t-spins setups that can be used in online play that are more complicated and are slightly less obvious than the triple and the double. Usually these setups are done from the start, when the field is clean and they are easier to set up, especially with the [[Random Generator|Randomiser]] used in Tetris DS. There are several alternate setups, the most commonly used being the [[STSD Setups|Super T-Spin Double]], the [[Double Triple Cannon Setups|Double Triple Cannon]] and the [[Imperial Cross]]. |
There are several other t-spins setups that can be used in online play that are more complicated and are slightly less obvious than the triple and the double. Usually these setups are done from the start, when the field is clean and they are easier to set up, especially with the [[Random Generator|Randomiser]] used in Tetris DS. There are several alternate setups, the most commonly used being the [[STSD Setups|Super T-Spin Double]], the [[Double Triple Cannon Setups|Double Triple Cannon]] and the [[Imperial Cross]]. |
||
| Line 566: | Line 524: | ||
{| |
{| |
||
| ⚫ | |||
| − | |{{pfstart}} |
||
| ⚫ | |||
| − | {{pfrow| | |G|G|G| |G|G|T|T}} |
||
{{pfrow|G|G|G|G|G|G|G| | |T}} |
{{pfrow|G|G|G|G|G|G|G| | |T}} |
||
{{pfend}} |
{{pfend}} |
||
| ⚫ | |||
| − | |{{pfstart}} |
||
| ⚫ | |||
| − | {{pfrow| | |G|G|G| |G|G|P| }} |
||
{{pfrow|G|G|G|G|G|G|G|P|P|P}} |
{{pfrow|G|G|G|G|G|G|G|P|P|P}} |
||
{{pfend}} |
{{pfend}} |
||
|} |
|} |
||
{| |
{| |
||
| ⚫ | |||
| − | |{{pfstart}} |
||
| − | {{pfrow| | | | | | | | | |T}} |
||
| − | {{pfrow| | |L|O|O| |S|S|T|T}} |
||
{{pfrow|L|L|L|O|O|S|S| | |T}} |
{{pfrow|L|L|L|O|O|S|S| | |T}} |
||
{{pfend}} |
{{pfend}} |
||
| ⚫ | |||
| − | |{{pfstart}} |
||
| − | {{pfrow| | | | | | | | | | }} |
||
| − | {{pfrow| | |L|O|O| |S|S|P| }} |
||
{{pfrow|L|L|L|O|O|S|S|P|P|P}} |
{{pfrow|L|L|L|O|O|S|S|P|P|P}} |
||
{{pfend}} |
{{pfend}} |
||
| Line 598: | Line 548: | ||
[[Image:Animatedtspin3.gif]] |
[[Image:Animatedtspin3.gif]] |
||
[[Image:Animatedtspin4.gif]] |
[[Image:Animatedtspin4.gif]] |
||
| − | |||
[[Category:T-Spin Methods]] |
[[Category:T-Spin Methods]] |
||
[[Category:T-Spin Kick Methods]] |
[[Category:T-Spin Kick Methods]] |
||
| − | [[Category: |
+ | [[Category:Guides]] |
Latest revision as of 19:42, 29 January 2020
Originally written by Rosti LFC on NSider (with thanks to Sully/CRAIGSS). Moved here and updated.
What Is A T-Spin?
Tetris DS is not the only game to acknowledge T-Spins, but other games have different criteria for what a T-Spin is. This is what Tetris DS uses to identify a T-Spin:
- The last movement of a piece must have been a rotation, ie. not a movement either downwards or to the side.
- Three of the four corner squares must be occupied by wither other pieces or the wall of the playing field. To try and explain this:
Imagine the four rotations in a 3x3 box like this:
|
|
|
|
|
For the rotation to be considered a T-Spin by the game, three of the four corners must be occupied. Here are some examples:
|
|
|
|
All of these would be classed as T-Spins by the game, and a box would flash 'T-Spin' on the right of the playing field, confirming so. The fact that the system works like this allows for some moves which shouldn't be T-spins:
|
|
|
|
As you can see, the piece could have been dropped in place, but this method registers it as a t-spin, and awards extra points/ garbage lines because of it. There are also some rotations where you might expect it to be a t-spin, but it isn't as not enough corner squares are occupied:
|
|
|
|
Using T-Spins On Single Player
The only way to get huge scores on marathon and line clear is to exploit the huge bonus points which t-spins give per line over Tetrises. The main two setups which you can use to get points are the double and triple setups:
|
|
|
It is helpful to know these setups and to be able to recognise them. This allows you to make them with improvisation (rather than by following certain setups), converting a possibly awful field into a very beneficial one.
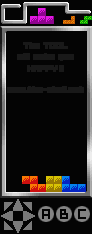
Back-To-Back T-Spin Triples
T-Spin triples are pretty useless on their own. While making them it can cause you to stack high around the setup, and once the T-Spin is done, you are left with an awkward and unbalanced playing field. To counter this triples are usually setup back-to-back, to get the greatest return for a messed up playing field.
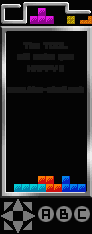
The 'ST' Setup
The main benefit to this setup is that it can allow the use of T-spin doubles indefinitely. In practice however, it is usually not quite that simple. The main shape requires a continuous back-to-back t-spin triple setup (two blocks, gap, two blocks, gap etc.) which is three blocks away from the wall of the playing field. This shape needs to be built without using S or T blocks, as they are needed to complete the doubles. Here is a basic portrayal of how it works:
|
|
|
|
|
|
|
|
|
|
|
|
|
|
|
Another advantage of this setup (which isn't shown in the above images) is that lines can be cleared while constructing the field. Back-to-back T-spin triple setups require you to create the shape, and then clear the lines with t-spins, meaning your stack can get dangerously high. The S/T setup allows you to clear lines with T-spins, as you go along.
Using T-Spins Online
Here are some pro's and con's to using T-Spins online:
PROS: They allow you to send huge amounts of garbage in a small timeframe (2 pieces). They also send more garbage per line cleared than Tetrises, so you can send lines quicker because you don't need to place as many pieces down.
CONS: Standard setups can be tricky to do quickly, and against a good opponent, it is likely you will have recieved enough garbage to kill you before you can pull off the maneouver. Another disadvantage is that the setups are easily ruined by mistakes or banana items, and the playing field you will be left with will be pretty awful. Also you may not always get the T piece resulting your pieces to pile up really high.
The secret of t-spins in multiplayer is not to be able to set them up, but to be able to see how a small manipulation of the playing field will create the opportunity for one.
Using Triples
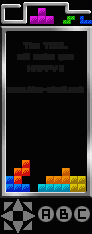
For example, the playing field looks like so and your next pieces are to the side:
|
|
|
|
|
Your Tetris orientated mind would position them something like this:
|
|
|
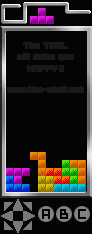
As this would keep the field open for Tetrises and would maintain an 'even build' structure. However, the layout can also easily be use for a t-spin triple by arranging the pieces differently, like this:
|
|
|
|
|
And voila! Six garbage lines are sent to your opponent if you get a t-piece. The field also requires little work to get back on to Tetrises (possibly a J-piece on the left and a square in the centre). This is the best way to use t-spins online against opponents - not by knowing how to set them up from the start, but by seeing how you can quickly create one halfway through a game.
Using Doubles
Triples are nice, but even if you are incredible at spotting the opportunities, it is unlikely that you will be able to use them often. The real weapon in the arsenal of a good wifi player is the T-Spin Double. I can almost guarantee that every player in the top 100 uses them extensively, or they have incredible, near inhuman speed to make up for it. The basic double setup is:
|
|
The main advantages of T-Spin doubles is that they are easy and quick to setup, and leave your playing field intact. Here are a selection of simple setups:
|
|
|
|
|
|
|
|
As you can see, it is possible to use every piece to make a setup,and unlike T-Spin Triples, the opportunities arise often if you can spot them (usually only needing one or two pieces), without you even trying to set them up. Before attempting doubles it is best to take a second to glance up to your next pieces to make sure that the t-piece is in your next seven blocks. If it isn't, then forget about it, because it will take too much time and you will have to stack around the setup while waiting for the right piece, leaving you with an unbalanced field afterwards, which will take time to fix.
Other Setups
There are several other t-spins setups that can be used in online play that are more complicated and are slightly less obvious than the triple and the double. Usually these setups are done from the start, when the field is clean and they are easier to set up, especially with the Randomiser used in Tetris DS. There are several alternate setups, the most commonly used being the Super T-Spin Double, the Double Triple Cannon and the Imperial Cross. Knowledge of these extra setups can be extremely useful. Though the opportunities to use them tend to arise less frequently than those for the t-spin double in open play, if the first few pieces are given in a generous order then they can be set up quite easily at the start of a game. Again though, it helps to either have a T-piece in the hold, or to make sure you'll be getting one soon, as you can get quite a nasty field if you have to wait too long or abort the setup.
Using T-Spins With S/Z Starts
T-spins can also get you out of an awkward starting position, when your first two pieces are "Z" and "S." Since you can only hold one, you're forced to drop the other, leaving a hole that is most easily filled with a soft drop. An easy alternative is to do a t-spin single:
|
|
|
|
|
|
In a perfect scenario, this only requires four blocks (one has to be the t-piece). It also sends two lines of garbage and makes your next Tetris count as back-to-back. This allows the player to benefit quite well from a situation that would otherwise have either slowed them down due to the soft-drop, or forced them to make a hole at the base of their stack.
Animations of T-spins: